


Sante DICOM Editor
The user interface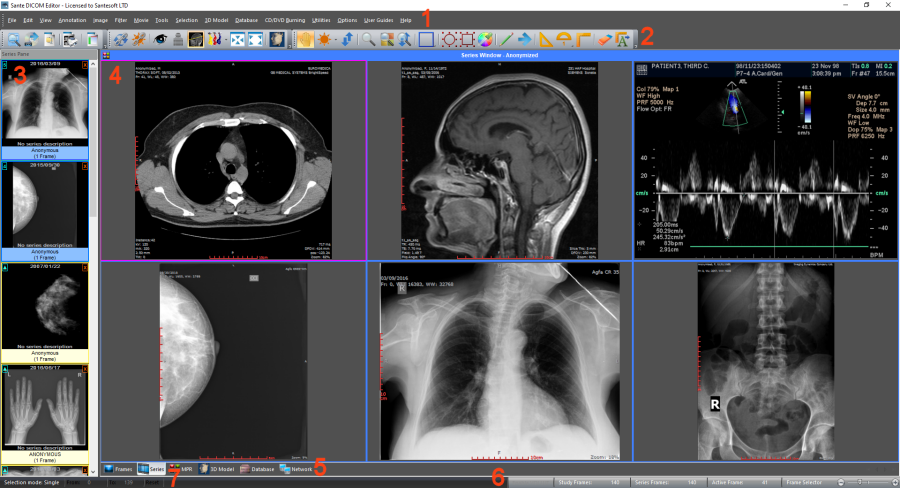 The user interface is divided in 7 parts: 1. The menu bar 2. The toolbars 3. The series pane 4. The main window 5. The Frames/Series/MPR/Database Mode selection tab 6. The frame selection slider 7. The frame range selection buttons The program works with DICOM series. If the user open a single file, the program creates a series with this file in the memory, and works with this single-file series. If the user open a study the program works with all the series of this study. All the opened series are displayed in the series pane (3) as thumbnails. The user can load an open series in the main window by double-clicking its thumbnail in the series pane (3), or by clicking the green arrow in the upper-left corner of the thumbnail. The series that have been loaded in the main window have blue color, and the series that have not been loaded in the main window have yellow color. The user can close a series by clicking the red X symbol in the upper-right corner of the thumbnail.   The main window (4) is divided in tiles and it has four modes: The "Frame Mode" that displays in its tiles the frames of the same series (the active series). The user can select the number of the tiles with the "Options The "Series Mode" that displays in its tiles all the loaded in the main window series. The user can select the number of the tiles with the "Options The active series is displayed in the "Series Mode" with a red rectangle around its tile (4). The user can select the active series by clicking its tile in the "Series Mode", or by single-clicking its thumbnail in the series pane. If a series is loaded in the main window, in the upper-left corner of its thumbnail is displayed the number of its "Series Mode" tile. If the user press the right mouse button in a "Series Mode" tile, a pop-up menu appears and lets the user empty the tile, empty all tiles, change the series tile, load another series to this tile and close the series that is loaded in this tile. This menu is not available in the "Frames Mode". 
The "MPR Mode" that displays the scout image/localizer, the axial volume of the series and the volumes of the coronal and sagittal reconstructions of the series. The "Database Mode" that allows the user to query and retrieve series and studies from the local database. 1. Menu bar The menu bar contains the commands of the program. 2. Toolbars The toolbars provide shortcut buttons for the most useful commands of the program. The program allows the user to add and remove toolbar buttons, so it fits their tastes and preferences. 3. Series Pane This pane displays a thumbnail for every open series. Every series thumbnail has the patient name, the series description and the number of frames of the series. All the opened series are displayed in the series pane (3) as thumbnails. If the user has loaded a series in the main window, this series is displayed with blue color. Otherwise is displayed with yellow color. 4. Main window The main window is the working area of the user. The main window displays the frames of the active series (Frame mode), or one frame of all the loaded series (Series mode). The user can select the mode of the main window from the Frames/Series selection tab. Every mode can have different number of tiles, and the user can select the number of tiles with the "Options  5. Frames/Series/MPR/Database selection tab If the tab "Frames" is selected the main window displays the frames of the active series (Frame Mode). If the tab "Series" is selected the main window displays all the loaded series (Series Mode). If the tab "MPR" is selected the main window displays the scout image/localizer and the axial/coronal/sagittal volumes of the series (MPR Mode). If the tab "Database" is selected the main window displays the interface of the local database (Database Mode). The main window in the frame mode (one tile)  The main window in the frame mode (six tiles): Displays six frames of the active series. The number of the tiles is selectable by the user.  The main window in the series mode (four tiles): Displays four different series. The number of the tiles is selectable by the user. The active series has a red rectangle around its tile.  The main window in the series mode displays the cross-reference lines of the series, if the series belong to the same study and the same patient. 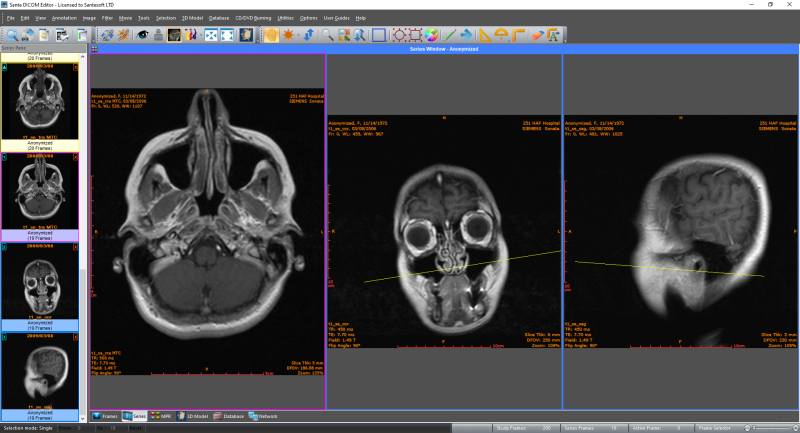 The main window in the MPR mode  The main window in the database mode: Displays the contents of the integrated database.  6. Frame selection slider If the active series has many frames, this slider lets the user select the active frame. Otherwise is disabled. 7. Frame range selection buttons Processing, selection, annotation and zoom actions can work with the current image or with a range of images. Use these buttons to select the frame range for these actions. By pressing the "From" button of the status bar, the current frame becomes the first frame of the range. By pressing the "To" button of the status bar, the current frame becomes the last frame of the range. By pressing the "Reset" button of the status bar, the frame range involves all frames of the multi-frame file or the multi-file series. The user can set up the frame range with the menu command "Edit The program supports the "drag-and-drop" operation.  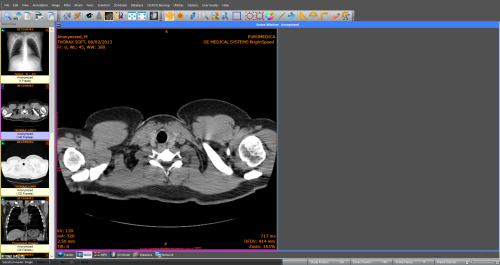  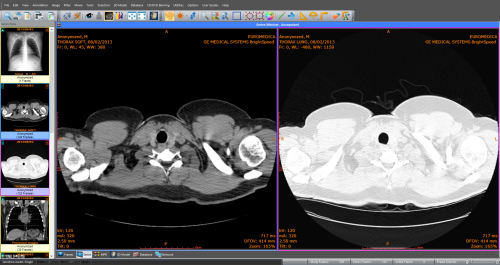 Customize the toolbarsThe program allows the users to add or remove toolbar buttons, so it fits their tastes and preferences.Any toolbar can be quickly customized with the "Add or Remove Buttons" submenu available from the chevron button when it is docked or with a special button in the toolbar caption when it is in the floating state.  By selecting the menu item "Customize" a dialog box appears and allows the user to drag-and-drop buttons from the dialog box to any toolbar. It allows also the user to drag buttons out of a toolbar, to remove them.  Dual monitor configurationThe program can display all the views (Frame/Series/MPR/Database/Network) in a single window or it can display the image views (Frame/Series/MPR) in one window and the Database/Network views in another.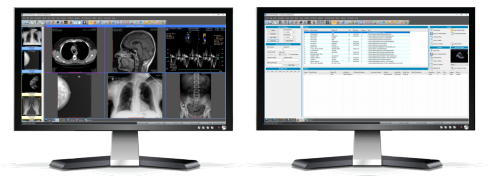 To enable the dual monitor feature:
|

Download
 Download the application
Quick Start Guide
 Sante DICOM Editor
What's new
 What's new in current version
On-line Shop
 Order it now
Written Quotes
For written quotes responsible is our e-commerce partner FastSpring.
 Ask for a written quote
How-to
- Edit DICOM file's header
- Work with the 3D window
- Dual monitor configuration
- Modify many DICOM headers sequentially
- Anonymize a DICOM file/series
- Use templates
- Compare Series
- Attach PDF report files to studies
- Take calibrated Ultrasound measurements
- Work with selections
- Convert images (jpeg, tiff, bitmap, png) to DICOM
- Convert movie files (avi, wmv, mpg, mp4) to DICOM
- Create anonymized Ultrasound movie files
- Configure the DICOM network services
- Command line switches
- Burn DICOM CD/DVD
- Automatic CD/DVD Label Printing
Copyright © 2026 Santesoft LTD, all rights reserved